Share your homesteading projects
Make new homesteading friends
Ask homesteading questions
Blog your homesteading journey
Debbie Pribele
440 posts
and
19 followers
in over 2 years
in over 2 years
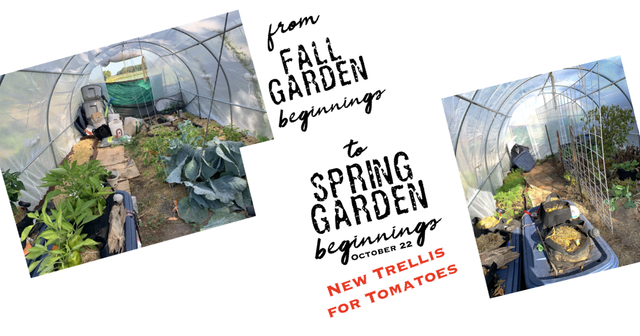
Our Hoophouses #4: New Garden Trellis for Tomatoes
This is
part 4
in a
14 part
series:
Our Hoophouses
...
-
Hoophouses: fall and winter gardening
-
New Garden Trellis for Tomatoes
-
Protecting Hoophouses for Winter
...
...
- Hoophouses: fall and winter gardening
- New Garden Trellis for Tomatoes
- Protecting Hoophouses for Winter
...
Making the hoophouse trellis for tomatoes.
As I write this, it is almost the end of October and there isn't much left growing in my gardens.
In the hoophouse, I have my precious peas that are just starting to be ready for harvest, carrots and parsnips, strawberries, and some new growth leaves on the cabbage stalks. Oh, and Swiss Chard and Kale. Well, that was quite the list, wasn't!
I love my fall garden.
In the hoophouse, I have my precious peas that are just starting to be ready for harvest, carrots and parsnips, strawberries, and some new growth leaves on the cabbage stalks. Oh, and Swiss Chard and Kale. Well, that was quite the list, wasn't!
I love my fall garden.
Even though it is not time to close up my hoophouse / greenhouse for the winter, I'm preparing it for next season, when I will be growing tomatoes in this larger garden structure.
This year, I grew a few tomato plants in the smaller hoophouse and they were a huge success. I had the best tomato harvest of many, many years. The main reason it was such a success is because the plastic-enclosed area kept the rabbits, etc, away from the plants and fruit.
Next year, I want to grow them in the bigger hoophouse so that I can grow more plants!
Things I learned from this year:
- the cattle panels make a better trellis for tomatoes than using cotton yarn, which broke when the fruit became too heavy
- definitely prune more, for air flow and easy access. For me, more plants and less branches is better than fewer plants and more branches.
- and... space the plants farther apart, again for air flow and easy access
The Next Season Plan
- the plan (currently) is to plant about a dozen tomato plants along the east side of the trellis and pepper plants on the west.
- I will still have the flower beds against the walls, for shorter plants.
- and... I want to create a seating area at the front (south end) for conversations, observation, and a gardening work space.
The Trellis Build
- T-posts were pounded into the ground along the centre of the greenhouse, for support
- The cattle panel was attached to the t-posts using metal clips, with the fencing about a foot off the ground. For my trellis arches, I used zipties to secure the fencing, which worked, but this time I went for metal.
- Prepping the fish pond for winter, I removed the pond plants and placed them along the trellis for compost
- I placed 4x4 posts on either side, creating a 3’ wide garden bed
- I, then, emptied my self-watering containers from this year and dumped the soil on top of the pond plants, inside the posts
- Next is a thick layer of leaves for mulch. (Waiting for the grandchildren’s PA Day so they can help out.)
- I also have wood chips coming and I will fill the walkways (between the centre trellis garden bed and the two side beds) and the seating area
- And, then, we wait for spring, letting nature decompose everything and build up a wonderful microbiome in the soil.
The hoophouses project has been fascinating, exciting, and successful. I can’t wait til next year!
- Debbie
Affiliate Links
(Affiliate links mean that I get a small profit from sales)
a simpler life