Share your homesteading projects
Make new homesteading friends
Ask homesteading questions
Blog your homesteading journey

Debbie Pribele
441 posts
and
19 followers
in over 2 years
in over 2 years
More from Debbie Pribele
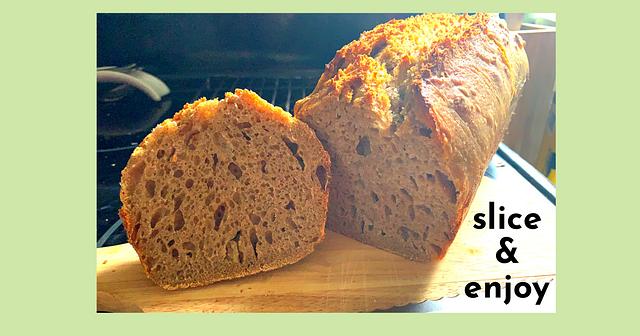
Sourdough bread - simple but effective method

Between changing my flour brand and dealing with a very cold kitchen this winter, I have struggled with making a beautiful sourdough bread.
The breads have tasted good but they have not risen much.
Many trial loaves of adapting this and that, I think I have found what works best with my stoneground flour and my kitchen.
The breads have tasted good but they have not risen much.
Many trial loaves of adapting this and that, I think I have found what works best with my stoneground flour and my kitchen.
The Starter
The day before I start my bread, I feed my starter … twice: once in the morning (as usual) and, then, again, about 8 hours before I start the bread process.
Because I make my bread at about 5 AM, I’m feeding the starter at around 9 PM the night before.
I follow the SOURDOUGH WHISPERER method and feed it like this:
Because I make my bread at about 5 AM, I’m feeding the starter at around 9 PM the night before.
I follow the SOURDOUGH WHISPERER method and feed it like this:
- 50 grams starter
- 30 grams water
- 30 grams flour
The Dough
At 5 AM, with a very happy, healthy starter, I mix, in my blender,
- 50 grams of starter
- 450 grams of water
- 550 grams of flour *
- 1 tsp salt
I run my KitchenAid mixer at level 3 and mix it just until the dough starts to pull away from the sides of the bowl.
* For this current loaf of bread, I used 100 grams of stoneground Spelt flour and 450 grams of Daily Grind flour, both from 1847.ca
I also added a scoop of “super greens”, a scoop of “super fibre”, and a handful of freeze-dried & powdered broccoli. I usually add in kale or spinach but I am all out and have to wait for this year’s harvest.
Next: I transfer the dough to my 8 cup Pyrex measuring bowl and let it rest.
The next step is to just let it sit and ferment until it is double in size. However, I like to handle my dough, so within that timeframe I do some “stretch and folds” to get a feel for the dough and to help build strength in the dough. (And to add a bit of love.)
Usually, I do a stretch and fold three times, once every half hour after putting it into the bowl.
With my last loaf, I kept forgetting about it and it only got stretched at 3 and 6 hours into the bulk fermentation - and it was my best loaf I had made to that point.
Fermentation
The “bulk fermentation” time is when the bacteria and yeasts are feasting and breaking down the components of the flour, making it more digestive for the human body.
This process usually takes about 8 hours.
In my kitchen, at this time of year, it is taking about 15 hours. This is where my glass measuring bowl comes in really handy! It is easy to see when the dough is doubling and it helps to keep me from rushing things.
This process usually takes about 8 hours.
In my kitchen, at this time of year, it is taking about 15 hours. This is where my glass measuring bowl comes in really handy! It is easy to see when the dough is doubling and it helps to keep me from rushing things.
Shaping
Once doubled, I put the dough onto a floured counter and shape it - very gently, working the dough as little as possible.
Next, with this method, is to place it directly into a lined/greased bread pan, cover it, and put it into the fridge for the next. No banneton required.
Next, with this method, is to place it directly into a lined/greased bread pan, cover it, and put it into the fridge for the next. No banneton required.
Baking
Next morning, 24 hours since we began, I score the bread, place the pan into a cold oven, cover it with a second bread pan, and bake it at 430F for an hour.
Again, with my kitchen and my oven, I’ve adapted that to 440F for 1 hour and 15 minutes.
Again, with my kitchen and my oven, I’ve adapted that to 440F for 1 hour and 15 minutes.
Rest
Although there is nothing better than a buttered slice of bread hot out of the oven, I’ve forced myself to let the bread rest for at least an hour before cutting into it. I want to give it the best chance to be at its best when I eat it.
Savouring it
a simpler life


